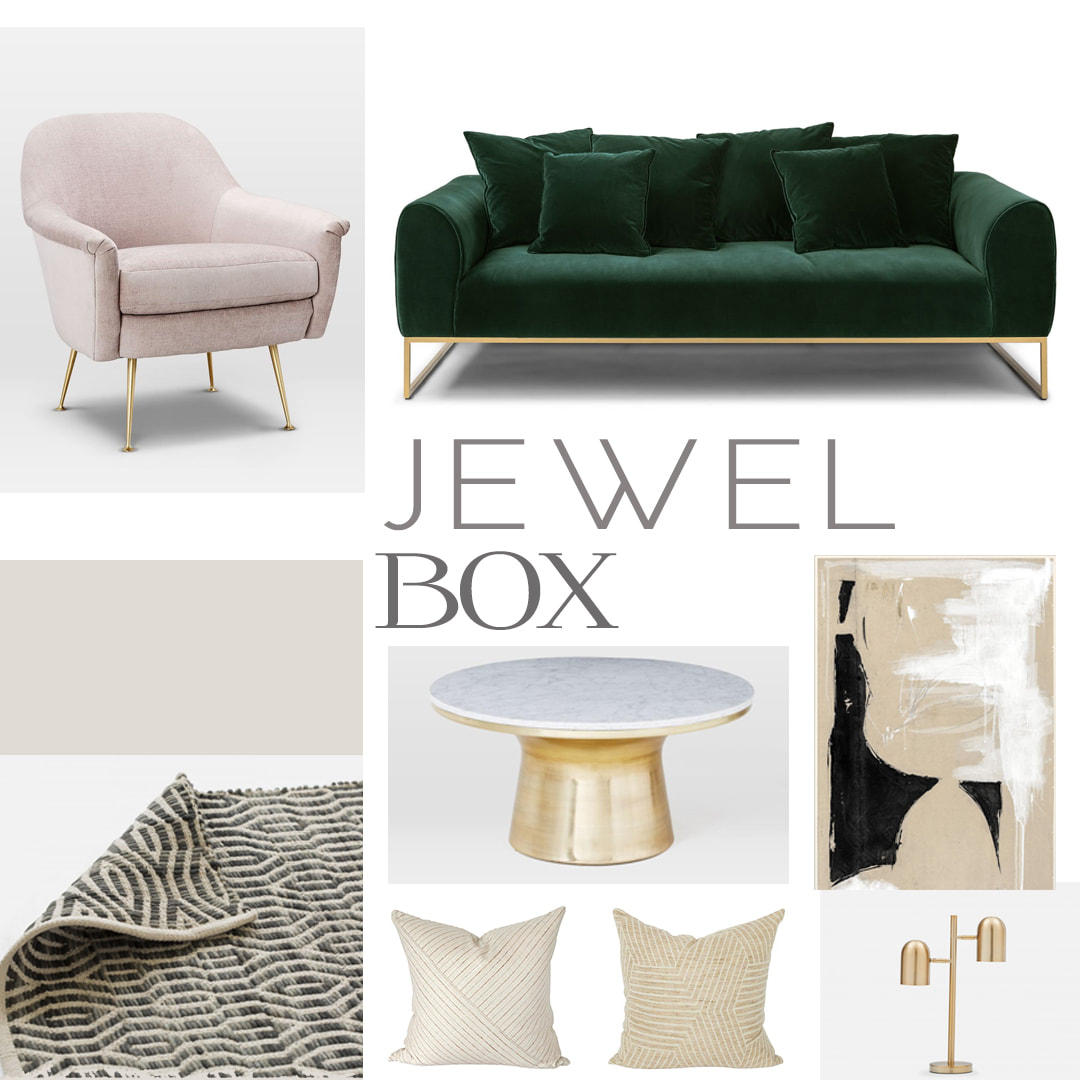
 Everyone has "that" room. You know, the one that never looks finished. Or "right". If you're a parent with young kids, it's usually the master bedroom. But living rooms can be sources of angst. Pillow-induced anxiety is REAL.
Luckily it's all fixable and usually for less money and hassle than you might think. The key is to stop thinking and start doing. You need a plan, my friend. I'm here to help. I'm here to tell you exactly what to buy and where to buy it. I'm here to put it all together for you in one easy, pretty email that will end your decorating inertia and get you an Insta-worthy room with a few clickable Canadian shopping links. Are you ready?
1 Comment
 I had a transformative olfactory experience a few weeks ago. It was during the Port Hope House Tour, (which you really should add to your September 2019 if you think you might enjoy peeping into beautifully decorated homes) when I stepped through the door of a cream-coloured cottage and into the nicest smelling house I think I've ever experienced. This was no Glade plug-in, or punch-in-the-face of Febreeze. It wasn't the essential oil tang of a Saje diffuser. This was heavenly. Masculine. Woodsy. Warm. Wooly. The fragrance lead me through the house, deeply inhaling, searching for the source which I discovered burning on a mantle:  Diptyque candles here and there.
I left Port Hope and set a straight course to the Diptyque counter at Saks, because sometimes I get greedy and I want everything for myself. I REALLY REALLY liked the smell of that house. Picture, if you will, a time lapse of me at the candle counter for 20 minutes trying to find THE ONE. I could not. I theorized that it was the mingling of the different candle scents that produced something totally one-off - an idea I absolutely love. A curated personal home fragrance. I need two or three to create the one of a kind smell cloud I'm hoping to effect. But sloowwww down: these babies cost $89 each. I know. It's just a candle. It's literally burning money at a rate of $1.25 per hour by my calculation. In the end, after much candle-induced anxiety, I bought just one. Too many decisions. No regrets: it smells pretty great on its own. But know that I'm working hard on the rationalizations that will let me get two more before the holidays. I do love a good-smelling house. What can you do with a budget of $100 and 100% existing furniture? Quite a lot, as it turns out. I spent the past week at Kingsley Primary School, the sweetest independent school around, bringing a bit of love to the kindergarten classroom. The school is located the basement of a church, so not great natural light (but some cool geometric stained glass windows) and a whole host of other restrictions: * no budget or time to paint walls * 10' high ceilings that feel cavernous * two entrances into the room create a bowling alley effect * 2000 SF of space needs to support 10 activity centres, including a new area for pre-schoolers * other groups, such as Scouts, use the room in the evenings so the furniture has to be in relatively mobile groupings to be easily moved at the end of each school day * must use all existing tables, chairs and shelving * total budget of $100! Here's a view of the room Monday morning: 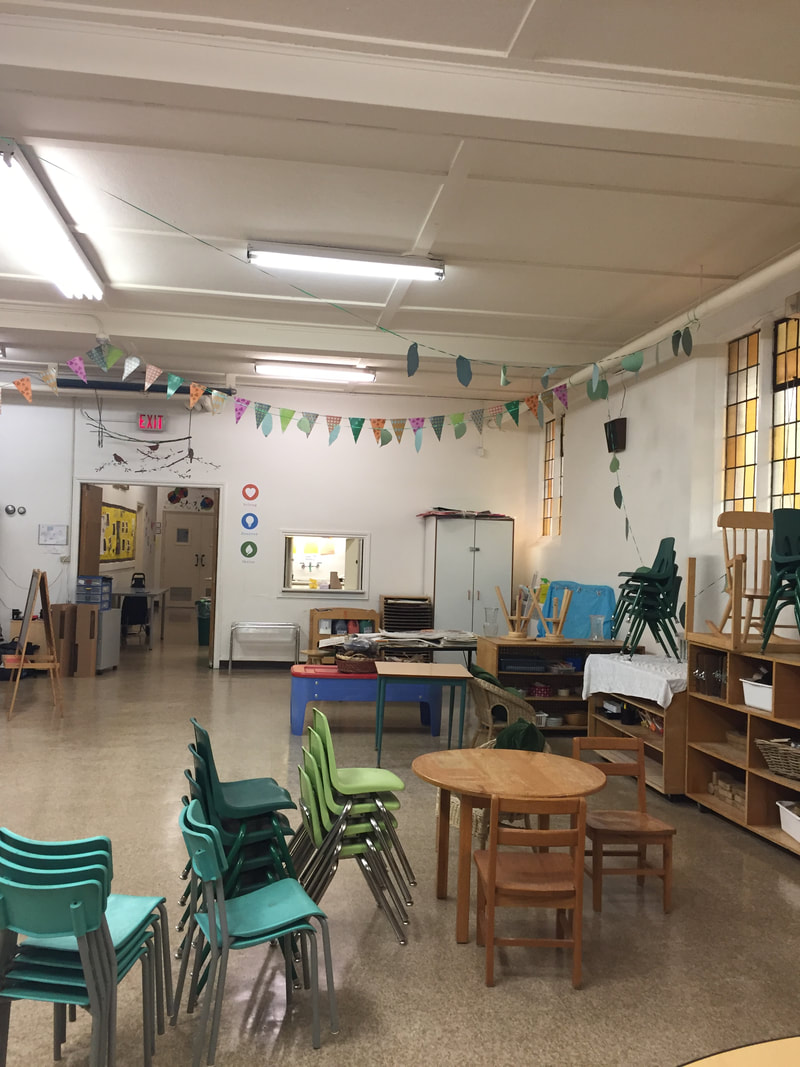 Yes, one huge open room with a lot of small furniture! 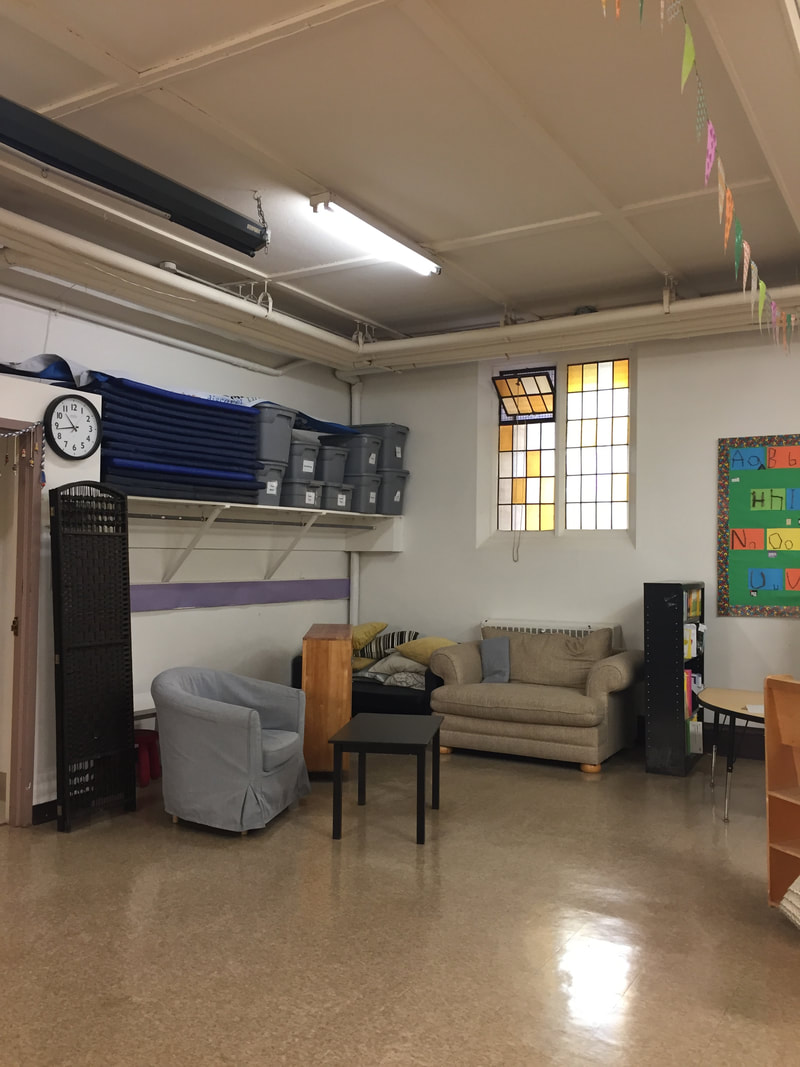 Out-in-the-open storage like these mats and bins made the room feel cluttered. Doing a clean sweep of the tops of shelves and cabinet and putting things into storage closets was a huge cost-free improvement. I wasn't crazy about this mismatched, over-sized furniture that had been used in the students' reading area. The scale was all wrong for little humans and it didn't feel inviting. Putting that jumbo beige chair to the curb was a joy :) Here's the same corner re-imagined as the blocks centre: 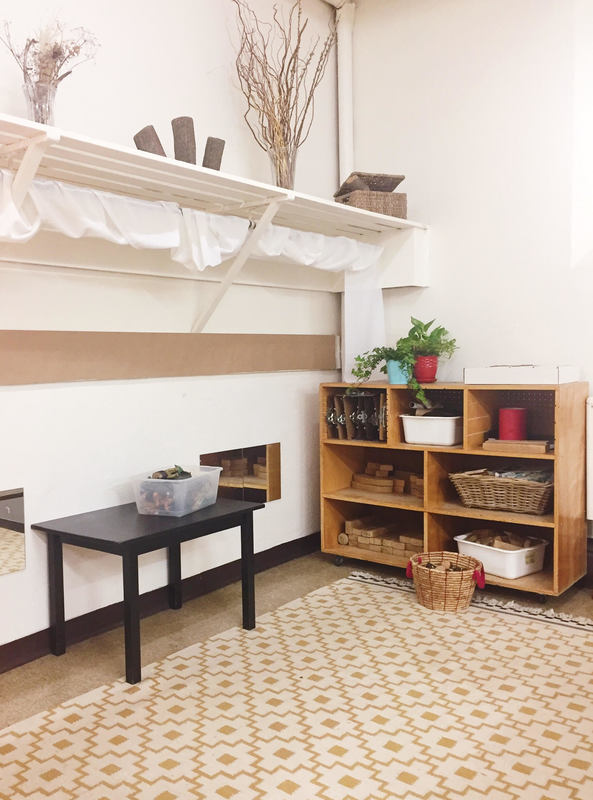 See what a difference clearing that shelf made? It is the perfect display spot for seasonal found objects. Kingsley has a strong outdoor/discovery curriculum so the shelf will be filled up with student finds very soon! A trio of donated low-light houseplants are another natural element. The horizontal band of craft paper is camouflaging a damaged wall. The students will be allowed to stencil or decorate the paper next month. The clothing rod was masked with a long length of donated fabric. This corner was the darkest in the classroom. I mounted mirror tiles at child height and brought in this adorable $20 Ikea find:   If you look in the second photo you can glimpse the old bulletin board, which was covered in an intense green paper with a graphically busy border. Colour aside, the paper becomes faded and hole-ridden over the course of a busy year, so I covered it with canvas and added a burlap edging.
It felt visually calmer than the green and allowed the actual materials on the board to stand out. Total cost $15 per board. I used painter's drop cloth canvas from Home Depot and burlap ribbon from Dollarama. The canvas was ironed and mounted with spray adhesive. I will upload more photos next week - stay tuned!
How do you get from Pinterest boards and Houzz Ideabooks to a finished room? Planning! It's the unglamorous part of the project that HGTV shows leave out. Before you hand over your house keys you must have all those details ironed out. Here are my best tips to ease your way.
1. Nail down the scope of work Before you meet with a decorator, put together a detailed project list that itemizes everything you want to do. It's important to capture all of your ideas up front so that the project can be accurately costed. Nothing is permanent at this point; the scope of work is a changing document - and it will certainly change as pricing comes back, or preferred materials are unavailable. It's helpful to know what items on your scope of work are non-negotiable and which will be the first to go if you have to scale back to stay on budget. (Psst: heated bathroom floors are always worth it if you live in Toronto!) 2. Get the right help A contractor is not a decorator and a decorator is not a contractor. Sure, some contractors have good design sense - especially those who do a lot of work with designers - but don't talk to a contractor before you have a plan. You'll end up with a price estimate based on builder basic materials and then get hit with thousands in additional material charges when you decide you want real hardwood floors and a waterfall-edge quartz counter. Best to know all of your costs up front so you can adjust your plan or budget before you spend a dime. A decorator translates your ideas and wishes into a workable plan that is shared with a contractor at a walk through. The plan is discussed in detail, potential problems are identified, and solutions or improvements are offered so that the project is ready to be accurately costed. 2. Know your budget It will be one of the first questions you'll be asked, so it's important to have a range of how much you have to spend on your project. While it's perfectly OK to have a price range, don't be coy with the number thinking that the decorator or contractor will spend to your maximum. A custom drapery treatment could cost $1,200 or it could cost $12,0000. Knowing if your budget is $15,000 or $75,000 informs fabric and finish selections and indicates your personal expectations about the overall level. Always ask the contractor for a quote with line-by-line pricing so you can evaluate per item and do an apples-to-apples comparison between quotes from various contractors. Something to think about is whether your budget includes HST and design fees. If so, make that known so the budget for furnishings and labour can be adjusted. 3. Have second and third choices Be ready for compromise and changes - they are inevitable. The hickory floor you chose has a three month backorder and you have to choose something else to keep the project moving. Or the marble you had in mind has gone up 15% due to currency fluctuations and you are already at max budget. Having back-ups for finishes in case of price or timing issues is a great stress reducer. Making decisions under pressure is never a good feeling. 4. What is your timeline? As soon as possible? Then you'll need to consider in-stock finishes and furniture. Custom goods and special orders often have long lead times. It's a shame to spend hours looking for the perfect chandelier only to discover it ships from Italy and takes 12 weeks and you need it it three. 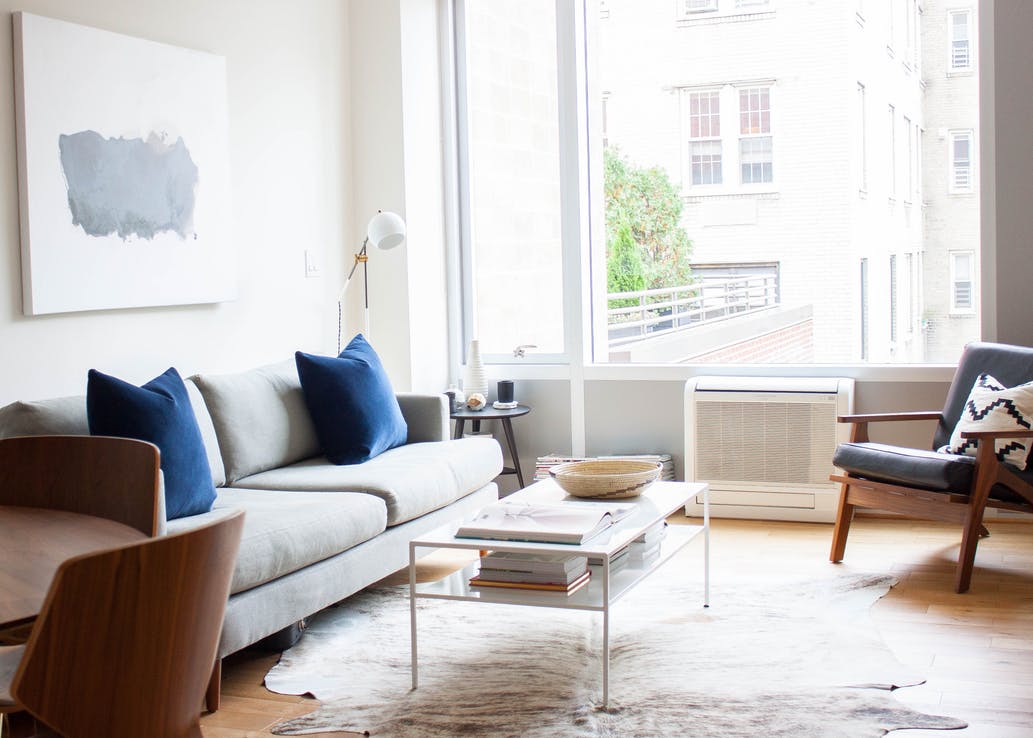 Image source: Apartment Therapy 1. Sofa + Chairs + Table This set-up works well for condos, skinny townhomes and semis. The key is to keep bulk to a minimum by choosing furniture with low, no or skinny arms. This track-arm sofa and wood-framed armchair are perfect examples. The narrow leggy table feels light while providing ample surface and storage. You could add one more arm chair to the mix like this: 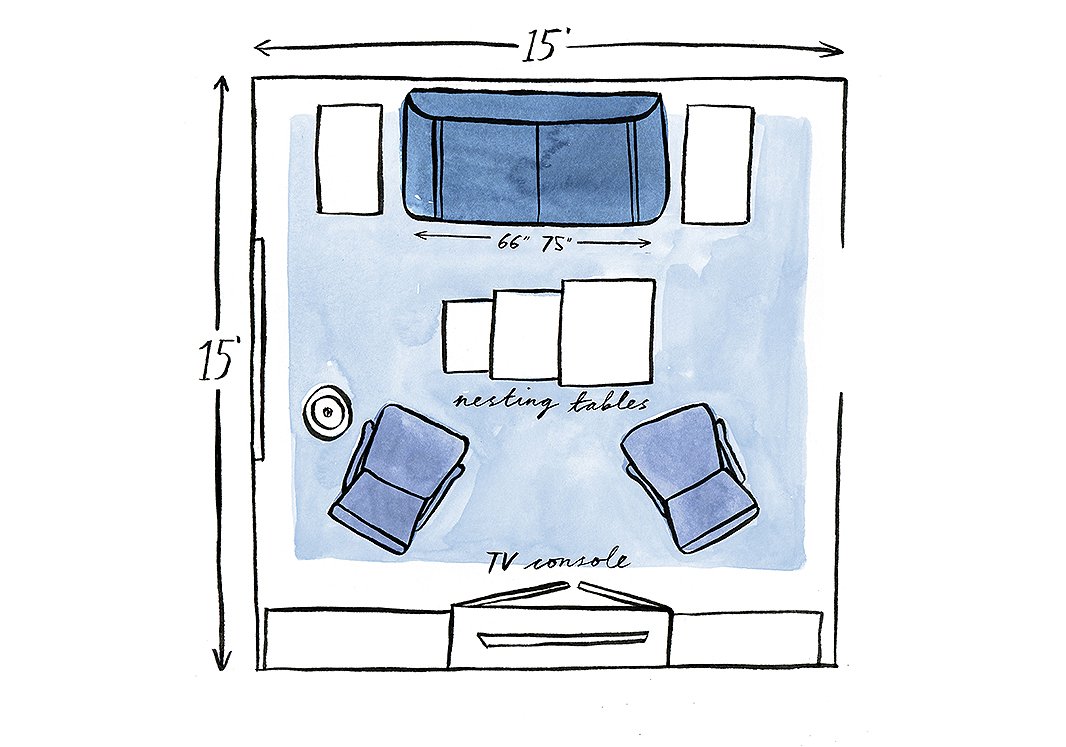 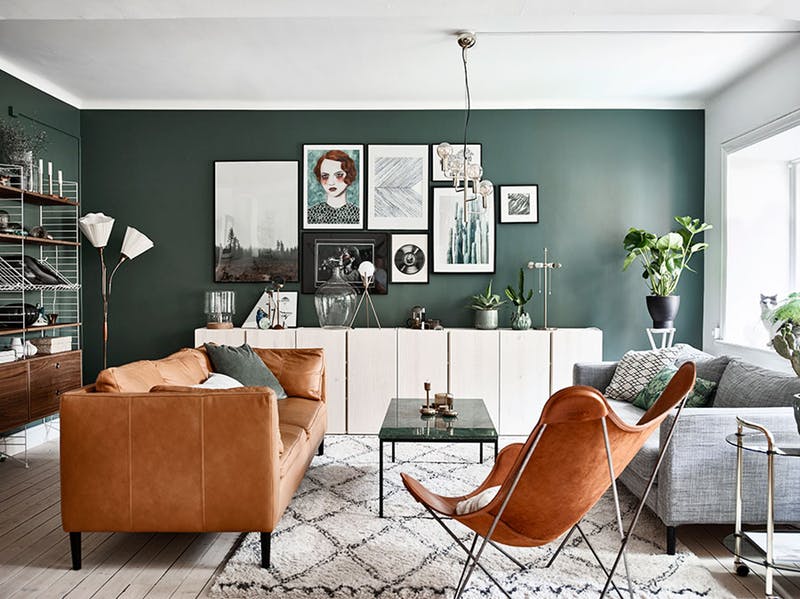 Image source: Elle Decoration 2. Two facing sofas If socializing rather than TV-watching is the main activity in your living room, the two sofa layout is a friendly option that is more flexible and space-saving than an L-sectional. Pull furniture away from the walls into the centre of the room and anchor the two sofas with a good-sized area rug. At a minimum, you'll want the front legs of both sofas to comfortably sit on the rug but it's preferable to a rug large enough to fit the back legs too. To determine if this layout will work in your space, calculate the depth of both sofas + the width of the coffee table + legroom space between table and sofa. A comfortable distance from coffee table to sofa edge is 15" - 18" on both sides. It takes a lot of confidence to pull off two different sofas in the same space, but this gorgeous photo shows how to do it well. Keeping the sofas of a similar scale and arm style is the key here. The leather chair is a unifies the whole thing. 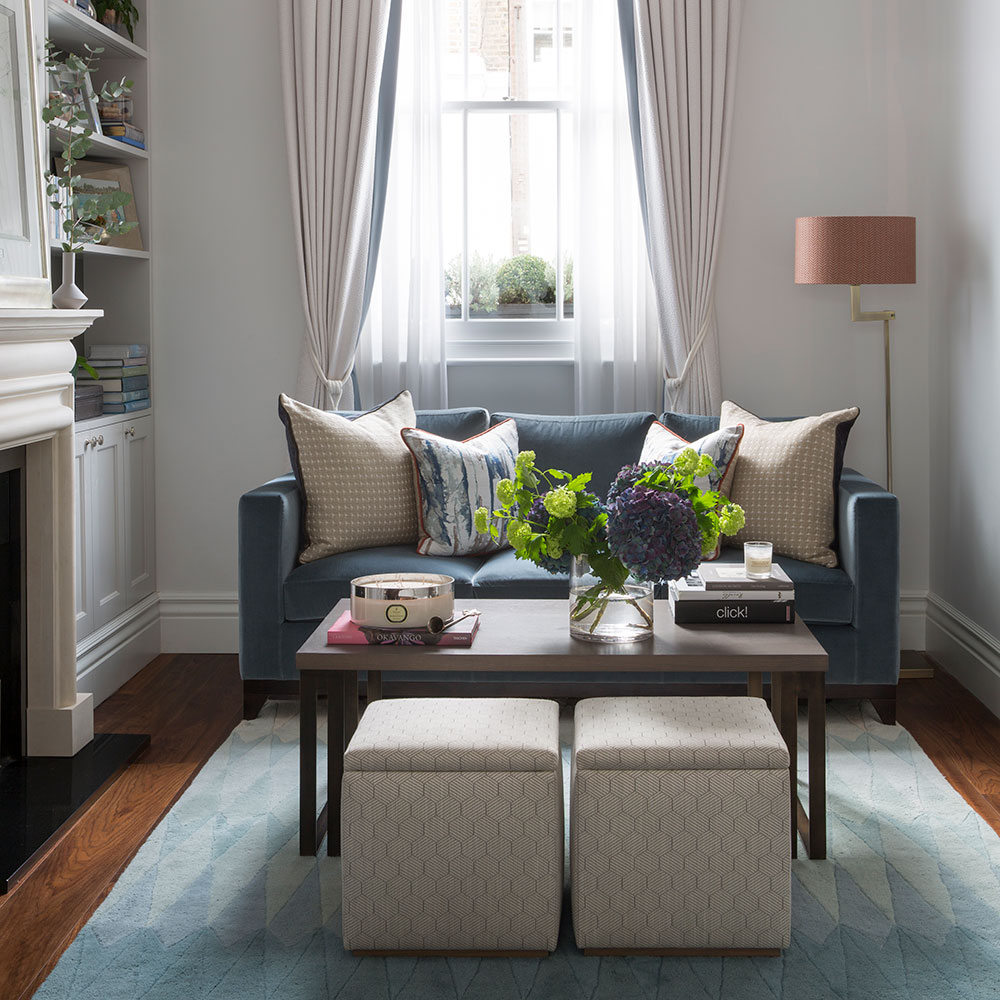 Image source: Home Info 3. Love seat + Cubes Seating with no or low backs means you can still place a TV behind them. These cubes look low enough to actually fit under the table if extra floor space were needed. Upholstered cubes are often available with hinged or removable lids - a clever way to sneak in extra storage. Swap the boxy cubes for wood stools or Moroccan poufs if that's more your style; the principle is the same. Here's another approach: 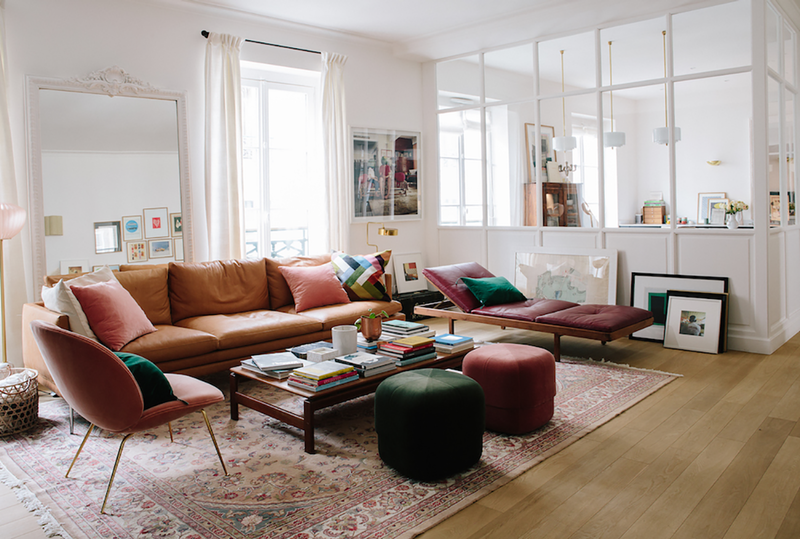 Image source: Cup of Jo 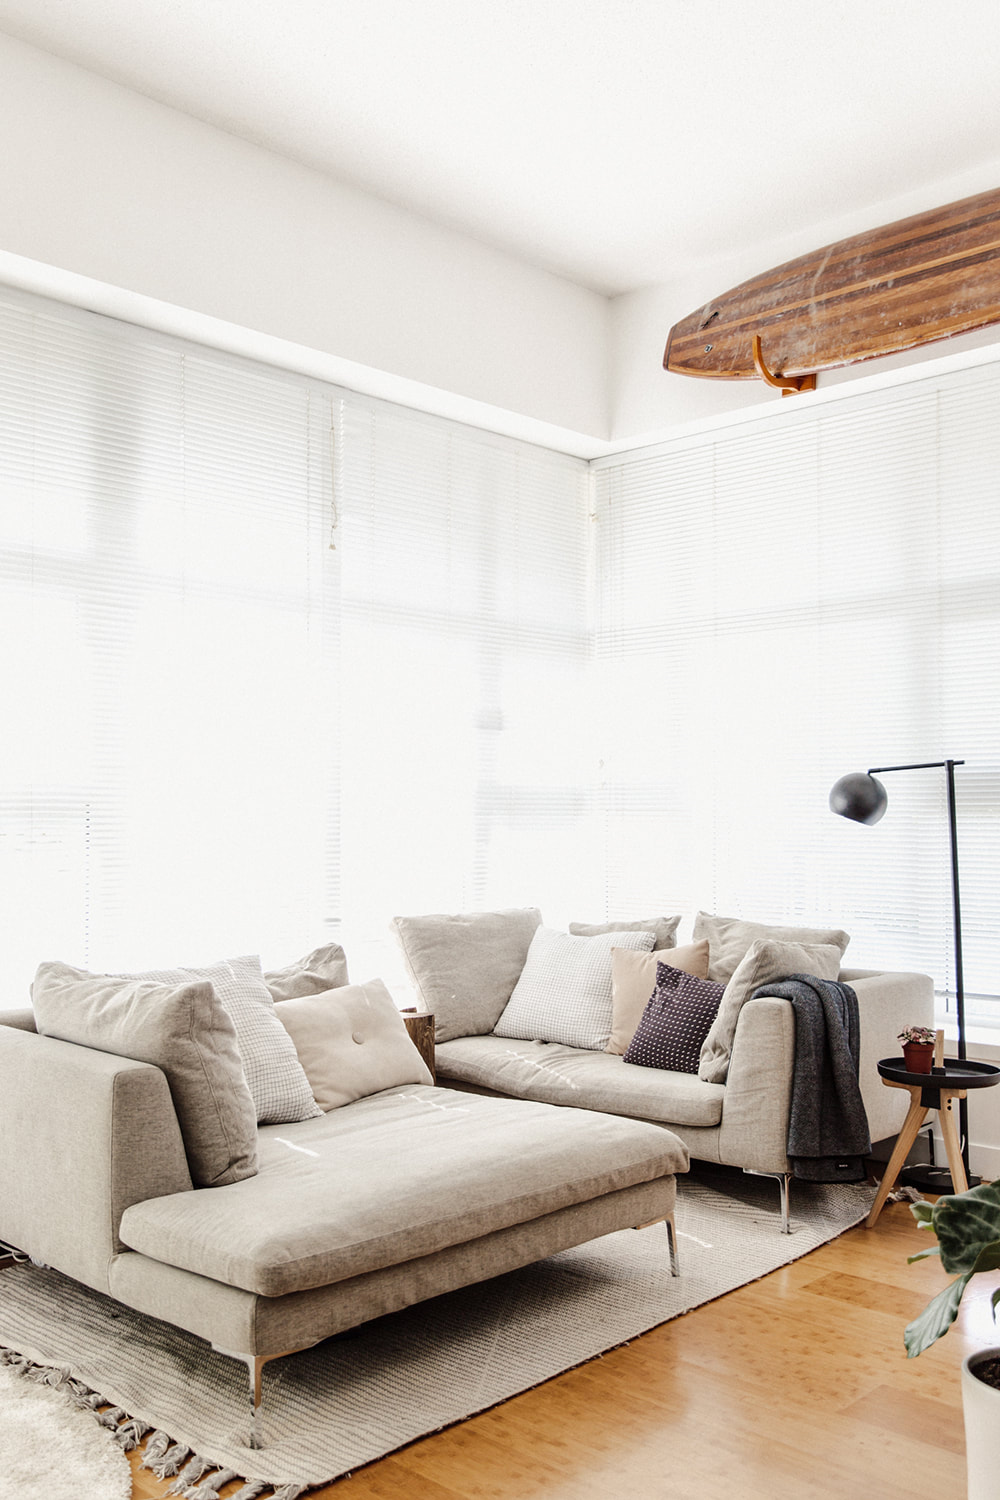 Image source: Cup of Jo 4. Prioritize Comfort
This living room space belongs to a Vancouver family of four who are stylishly and cozily living in a mere 600 square feet. I like how comfort was the main goal with deep, lounge-y furniture. How cuddly and inviting!
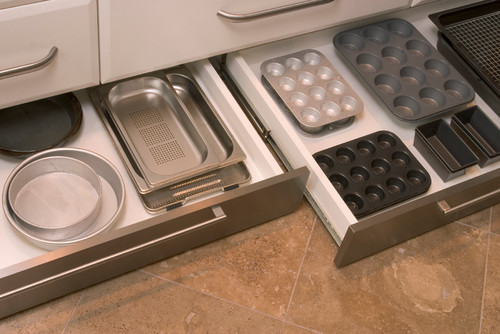
Divided vertical storage is a must for wrangling baking sheets, muffin tins and assorted lids and grills. I really like this built-in drawer situation, but you can retrofit any cabinet with $7 IKEA UTRUSTA partitions.
One of my favourite ways to sneak more storage into a small kitchen is to use the depth created by the counter overhang. The functional side of the island holds a standard 24" deep cabinet, which is backed with a 10" - 15" deep cabinet. Leave open for pretty display pieces like this, or add a door for closed storage.
Just 4" is needed to gain an ultra narrow pull-out cabinet to hold cooking oils and flavourings or utensils right where you need them: beside the cooktop.
Toe kick drawers make use of every last bit of space. Being at floor level this is the place to store infrequently used items such as platters, fancy linens or emergency supplies. Make sure to choose a recessed or flat pull so you don't accidentally kick it.
Every kitchen needs a pantry to hold small appliances and food. A luxe alternative to the freestanding pantry unit is a custom walk-in. Here, a nook was framed out, the wall tiled to match the kitchen backsplash and open shelving added. The antique doors are a stylish touch with big personality.
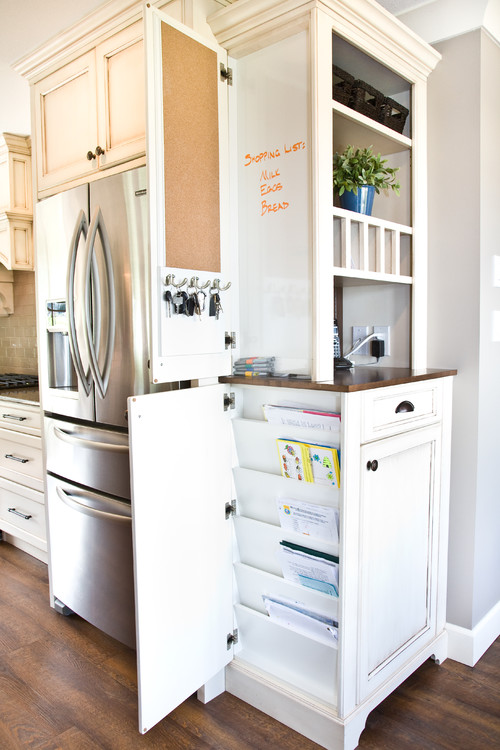
I love this hidden "command centre" solution. Cork and whiteboards, hooks for keys and paper slots all neatly hidden behind hinged doors but totally accessible. This literally takes no space: it's the side of a cabinet cleverly put to use so the counters and fridge remain clutter-free.
Imagine this same picture with cabinetry. Kind of boring, right? Too much cabinetry can look unimaginative - especially in a large kitchen. Barn doors are terrific in tight spaces because they slide horizontally so you don't have to factor in a door swing. And they look amazing painted a focal colour.
It's such a short season in Toronto, this blissful period of outdoor living. There is a magical period when it is just the right temperature to sit bare-armed outside until the moon comes up, and the June bugs have finished their mad ritual of bouncing off the window into my lap, and it seems like the sun is never going to set. Heaven. I'm never going to be a winter lover, no matter how much hygge I bring into my life. Summer is my season hands down. We were planning a major reno of our backyard (the current situation features a chain link fence around a well-loved but very 1970s swimming pool) but the pricing came back significantly higher than we budgeted. Coupled with a month-long trip to Italy in July and our sell/stay/sell/stay conversations, it was clear we needed to put on the brakes. At least until spring. In the meantime, here is what I had planned for the furniture and general feel. I just can't do matched patio sets! 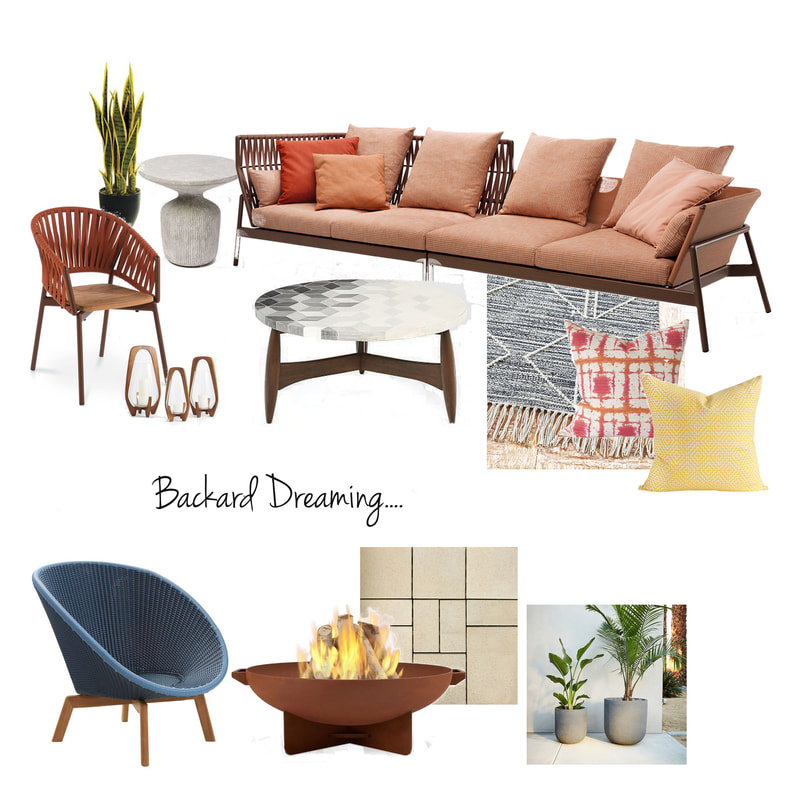 Image: Nicole Morell Interiors
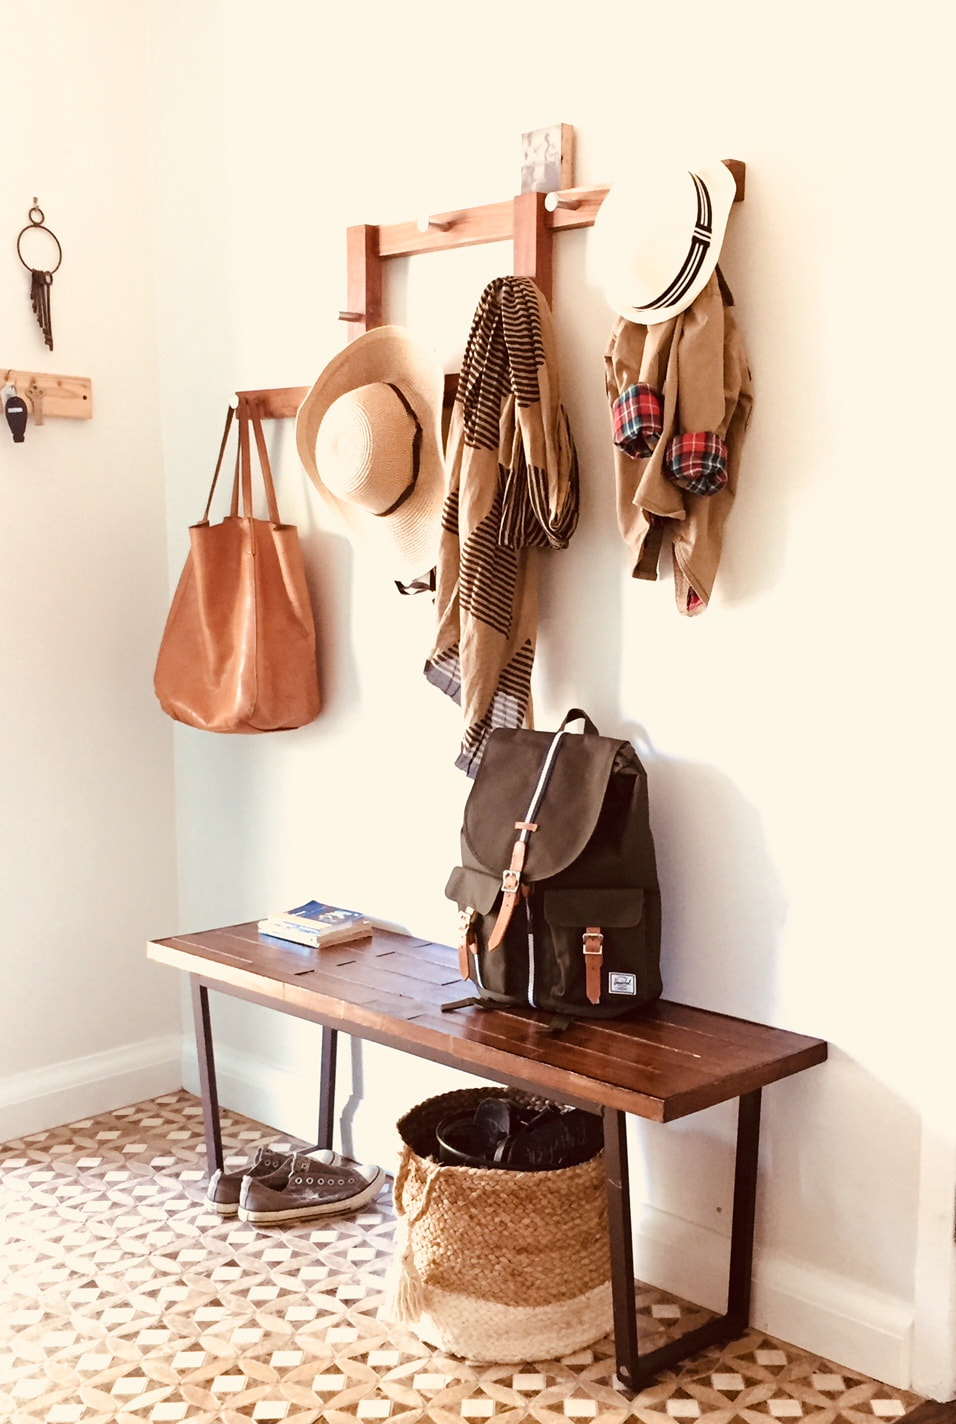 Image: Nicole Morell Interiors My perfectly imperfect entry. It's a scant 5 feet wide and maybe 6 feet long. It sees a lot of action when three kids come tumbling in the door with their backpacks, jackets, hats, and shoes, shoes, shoes.
We don't have the luxury of a second entrance or - my stars - a mudroom, so we ask a lot of this little space. It takes some doing to keep it tidy. Truthfully, my kids loathe digging through baskets for their shoes, but I hate shoe piles so the basket stays in summer. In winter a big boot tray sits beneath the bench. Yes, I would love a sleek console table and a huge round mirror with a perfectly aged Persian runner underfoot, but...reality. That runner wouldn't last a month. Without a perch to sit and put on shoes the walls would have more hand prints than they already do. And the tiny coat closet would be maxed out if we eliminated the wall hooks. I've come to believe, strongly so, that a house has to feel right to the people who live there. When we focus only on how a space looks - or how we think it should look - and forget about how it feels we miss out on the part that makes our home lovely, comfortable and inviting. My place isn't perfect. That's OK. It feels good to be here. 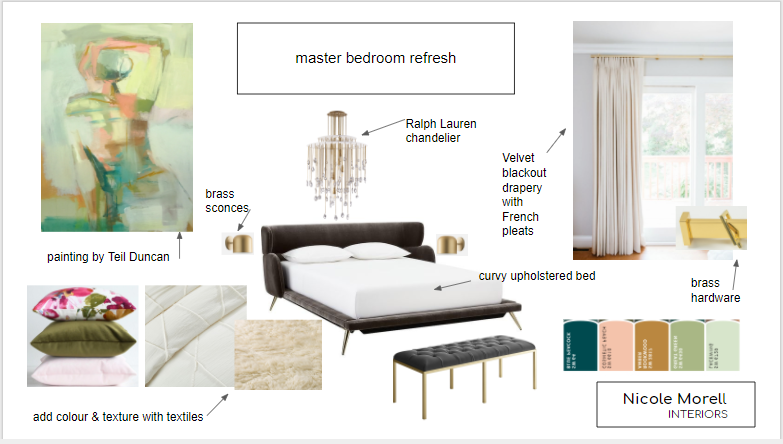 If your bedroom is underwhelming, you're in good company. We tend to lavish decorating attention on the public spaces in our homes, redoing kitchens and baths, living rooms and laundry rooms before giving our own private spaces a second thought. If this sounds familiar, it's time to chuck those crappy pillows and treat yourself to a grown-up bedroom.
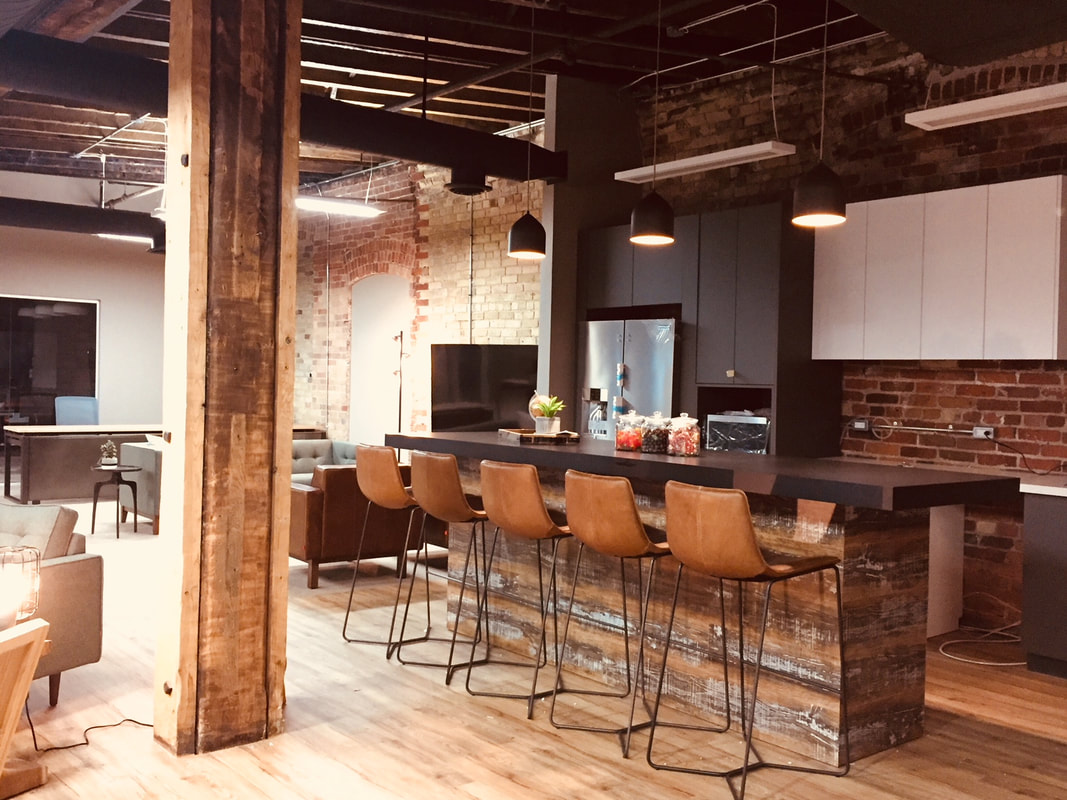
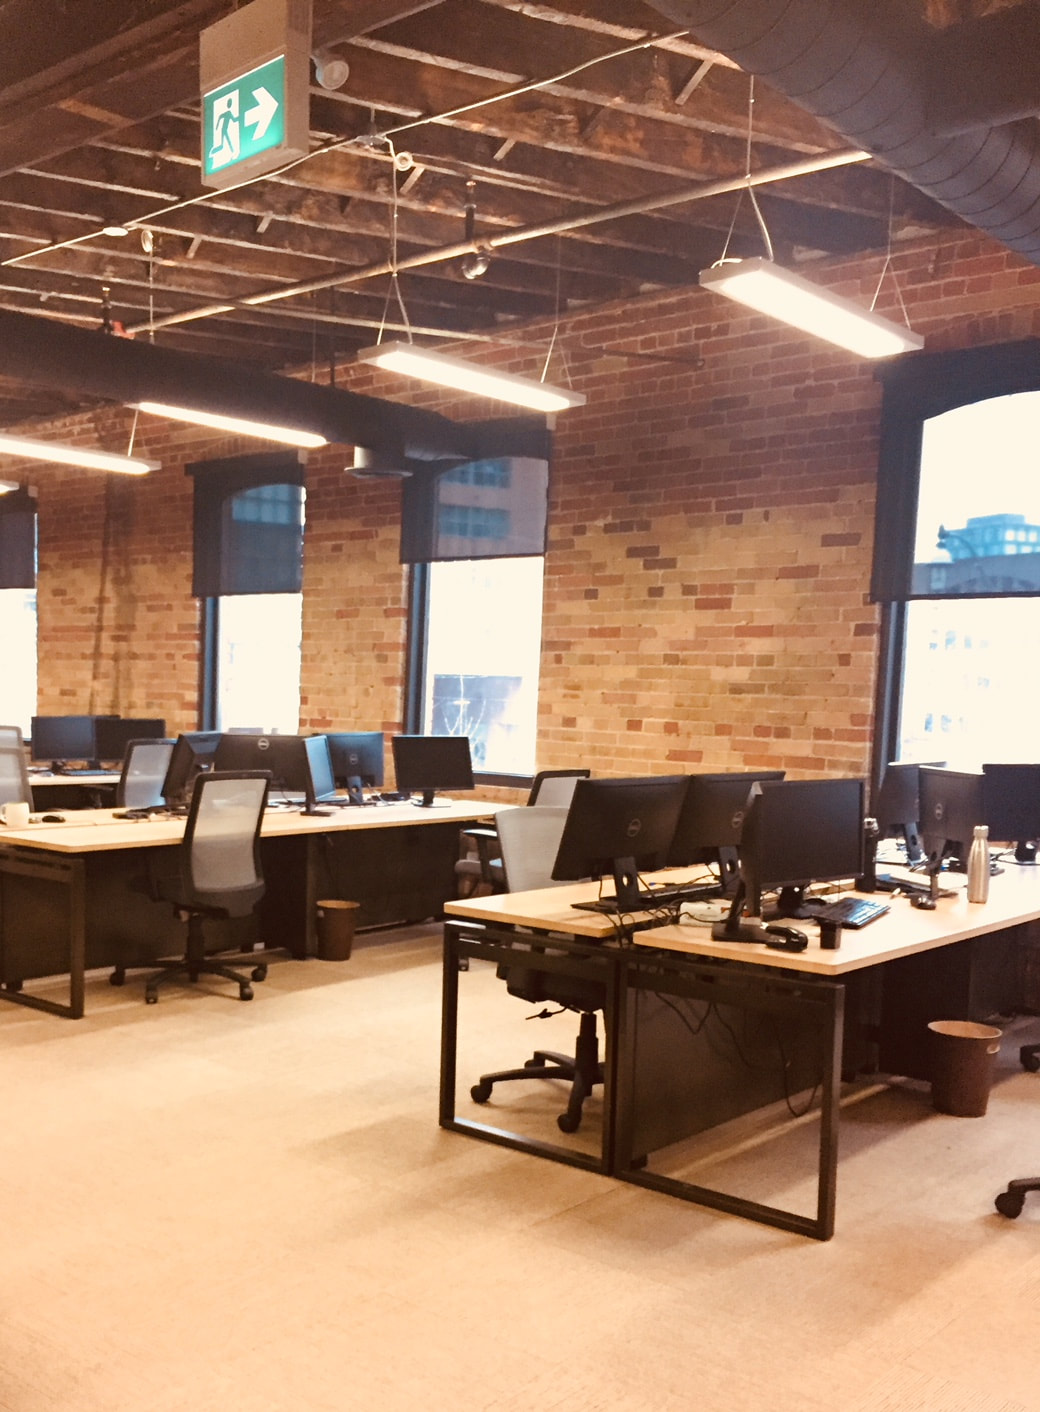
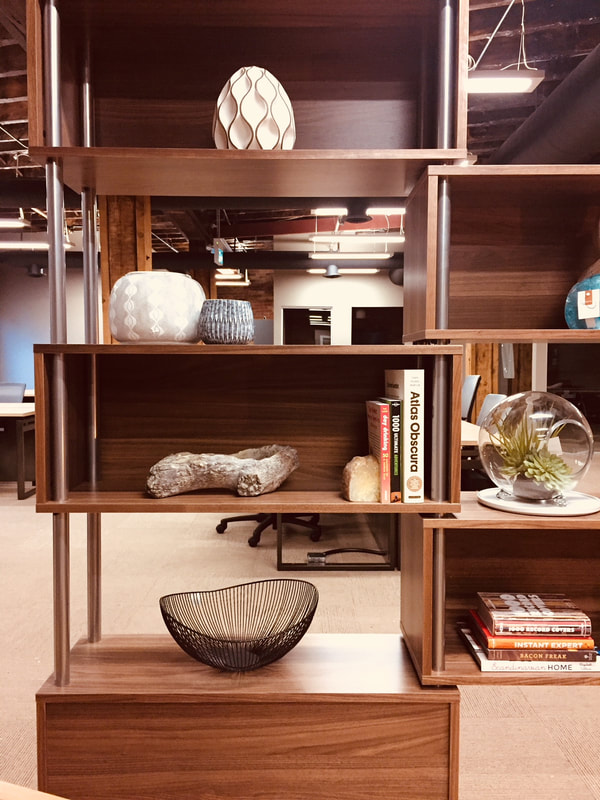
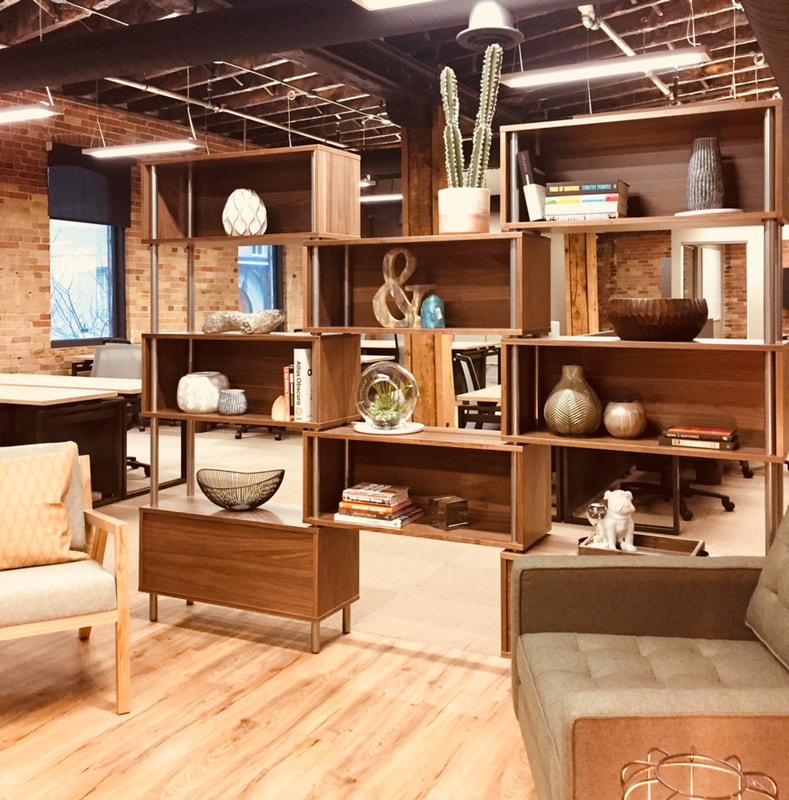
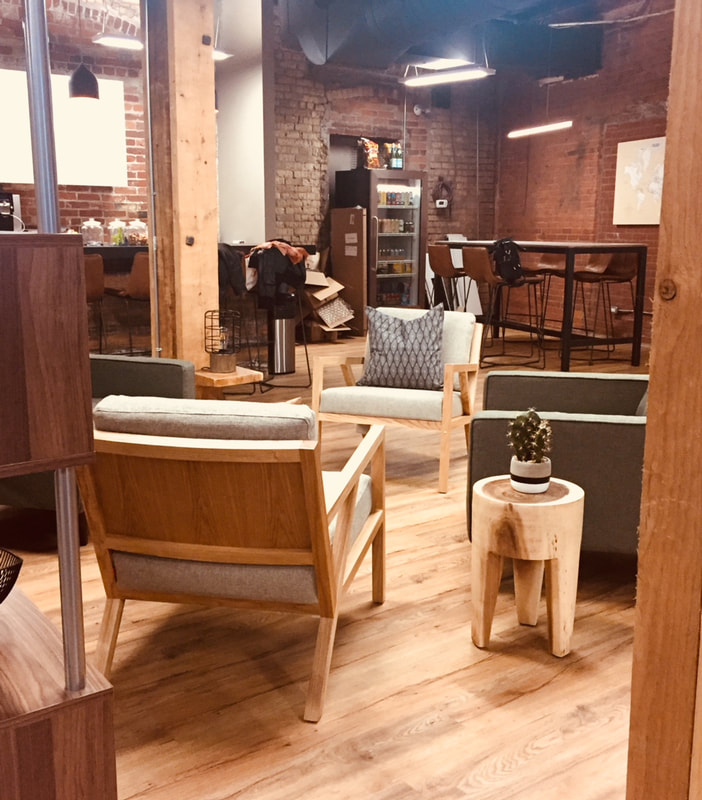
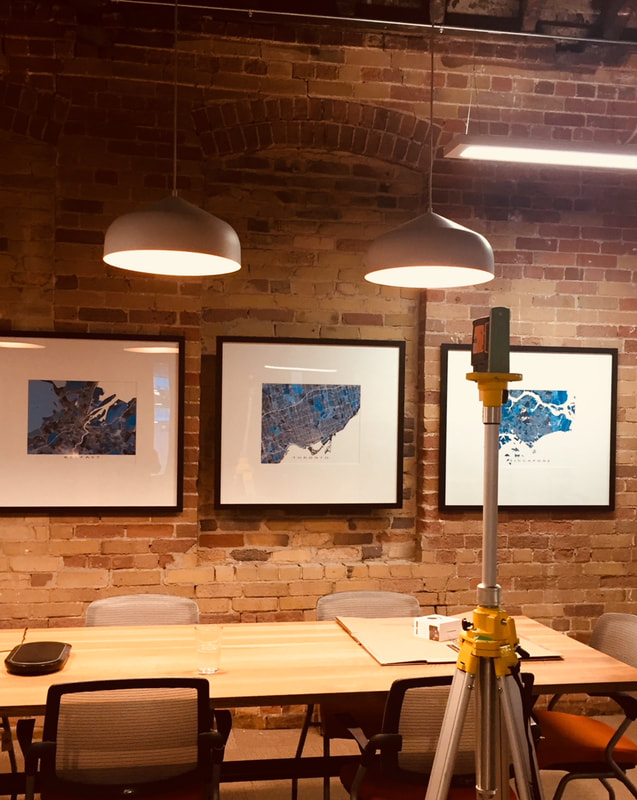
Good news: a bedroom re-do is one of the least expensive decorating jobs but one that comes with a huge emotional pay-off. Here's my 5 step guide to the bedroom of your dreams: 1. Assess your space & your stuff What's happening in your room? Is there enough furniture or too much? Do you have adequate clothing storage? Is there anything in your room that shouldn't be? (treadmill I'm looking at you) Do you prefer total darkness for sleeping? Is your mattress comfortable? What furniture and decorative pieces are you keeping? What will be replaced? 2. Make a space plan If you are moving furniture around, or want to add new pieces make sure everything fits with a to-scale furniture plan. 3. Inspiration If you haven't already, get yourself over to Pinterest, Houzz, Apartment Therapy, Remodelista and figure out your design jam. 4. Sourcing Shopping and sourcing are not the same thing. Shopping is when you go to Home Sense and you find a really cute turquoise pillow that you just have to have and you'll find a place for it. Sourcing is when you are looking for a nightstand that is 24" high (because you measured your bed height) and no more than 15" wide (because your room is narrow) and preferably something brass with a marble top (because that's the look you love) and costs $250- $350 a piece (because you have a budget). Make a list of items to source. Be sure to include required dimensions, materials, finishes and target price points. Know where you may like to splurge (luxe linens?) and where you don't mind saving (lighting?) 5. Do one big shop It can be tricky to get a cohesive look when you approach decorating a room piecemeal. It's also really frustrating when a project drags on, so have all the decisions made before you start shopping. Make decisions on paint, furniture, bedding, artwork and mirrors, window coverings, area rug, throw pillows, lighting and decorative objects before buying anything. Then, buy everything all at once. I don't mean to literally buy everything the same day, and certainly not all from the same source. Have all the purchase decisions made in advance to reduce falling victim to decision paralysis or budget creep or just never really finishing your project. My clients asked for help turning a century-old loft space in Toronto's lovely St. Lawrence Market neighbourhood into a cool office that would wow their youthful team and woo potential employees. The 3000-square foot space, which is entirely original red brick, had been gutted by flood, and a fire decades ago left the original ceiling beams gorgeously charred. I designed the space around materials often used in industrial-modern design: hot rolled patinaed steel, reclaimed wood and warehouse-style lighting. We had to establish work stations for 24 people, three meeting rooms, functional and inviting lounge areas and a kick-ass bar-slash-kitchen for this work hard/play hard team. The final layout: 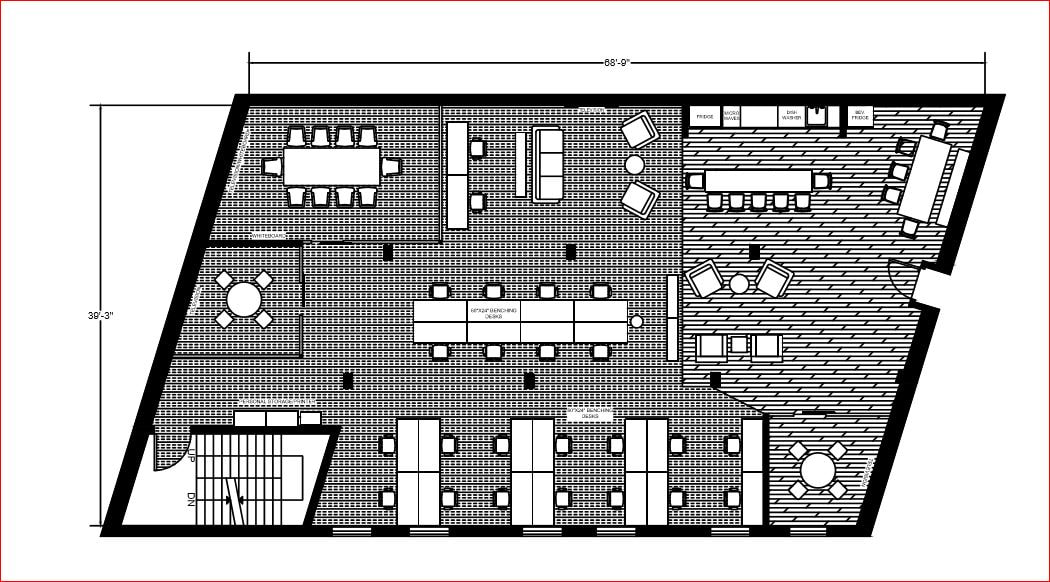 The hub of the space is the ten-foot bar, where casual gatherings take place on distressed leather stools from West Elm. There is room for the entire office to gather for business updates and Friday night drinks. A 70" television is within view for sports events. The 41" high bar is the perfect height for standing work, which is becoming more important to desk-bound office workers. We positioned as many of the workstations as would fit along the window wall, to take advantage of the southern light. Simple, bench-style desks were chosen with a hot rolled steel base and barnwood-look top. The office was designed with no assigned desks: staff choose their spot for the day. If you don't snag a window seat one day, get to work earlier tomorrow :) But in fact, the office was designed to encourage movement, collaboration and working wherever feels good. Industrial lockers offer safe storage for personal effects. Two living room-like areas offer comfortable seating by Gus Modern. The lounge spaces invite informal gatherings or alternative work spots with coffee tables, rugs and side tables. Soft furnishings are seriously comfortable but firm enough to work at comfortably. A gorgeous walnut mid-century-style bookshelf neatly divides the lounge space from the workstations behind without adding cluttering partition walls. The main conference room was designed with a generous 10-foot custom table crafted from solid oak with a blackened steel X-base. Map artwork was chosen to give a nod to the company's many offices around the globe. The cobalt blue looks fantastic against the red-orange brick.
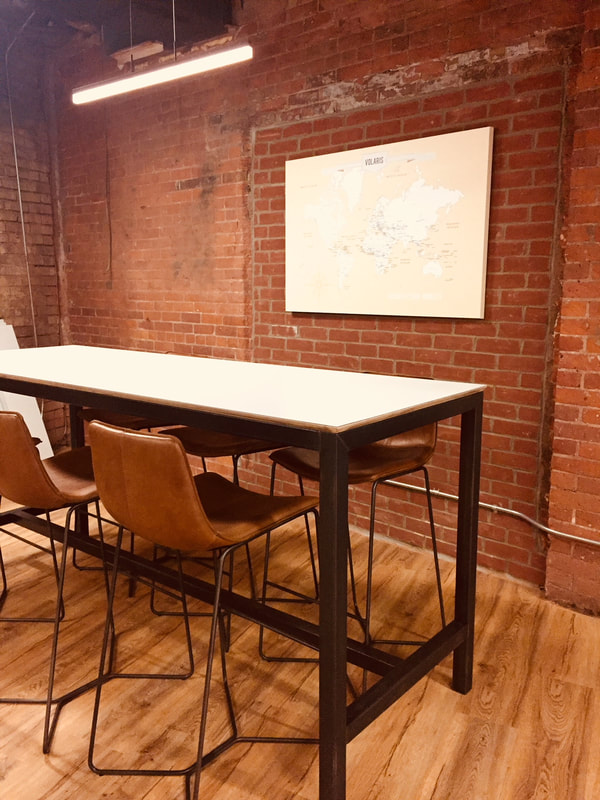
Adjacent to the bar is a 9-foot long communal dining table. Behind it, a large custom push-pin map allows staffers to mark travels and acquisitions. |


 RSS Feed